Southern Peach Cobbler

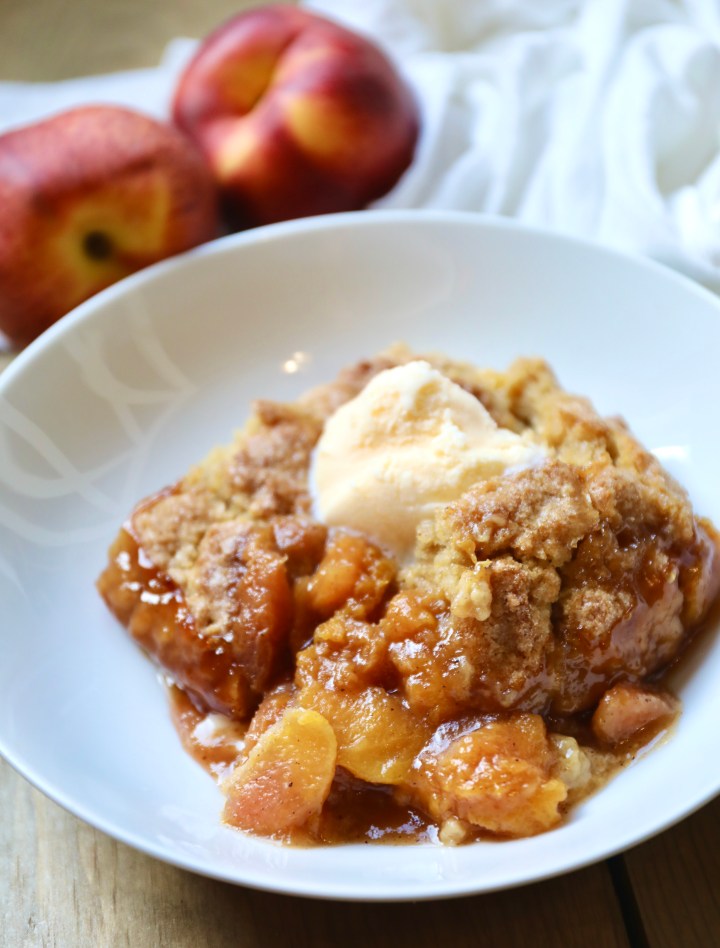
It’s peach season in the Texas hill country! I absolutely love fresh peaches and can enjoy them in just about any way. These sweet, juicy, full of nectar little beauties go well in cocktails (like my Hill Country Peach Spritzer I did last season), for pies and cobblers, on top of pancakes and waffles, jams & preserves, accompanied on a charcuterie board for a nice cheese pairing, or just eaten fresh! I am a huge fan of cobblers and pies, as I feel they are such a staple in the south. I grew up on peach cobbler, and wanted to make it for a family BBQ recently. This recipe is easy and is as authentic and comforting as it gets! Enjoy with a scoop of vanilla ice cream, or some whipped cream for the perfect summer (or anytime) dessert!

Ingredients

Peach Filling

  • 8 medium-size fresh peaches peeled and sliced into thin wedges or bite size chunks
  • 1 teaspoon fresh lemon juice
  • 1/4 cup white sugar
  • 1/4 cup brown sugar
  • 1/4 teaspoon cinnamon
  • 1/8 teaspoon nutmeg
  • 2 teaspoons cornstarch

Crust Topping

  • 2 cups all-purpose flour
  • 1/2 cup white sugar
  • 1/2 cup brown sugar
  • 2 teaspoon baking powder
  • 1 teaspoon kosher salt
  • 12 tablespoons butter chilled and grated (use cheese grater)
  • 1/2 cup boiling water

Cinnamon Sugar Topping Ingredients

  • 1/3 cup white sugar
  • 2 teaspoons cinnamon

Instructions

  • Preheat oven to 425°F. Place a large baking sheet covered in foil on the lowest rack in the oven. This cobbler overflows a bit almost every time I make it. The baking pan will catch the drips and prevent a mess in the oven.
  • In a large bowl, combine the peaches and the lemon juice and then add the rest of the filling ingredients. Stir to coat and then pour into a 9×13 baking dish.
  • Bake the peach mixture in the preheated oven for 10 minutes. While the peaches are baking, combine the  dry topping ingredients and whisk to combine. Toss the grated butter in the flour mixture. Stir in the boiling water, just until combined, leaving plenty of little lumps of butter.
  • Remove the peaches from the oven and drop the topping over them in spoonfuls. Sprinkle the cobbler topping with the cinnamon sugar topping. Bake until the crust is golden and a toothpick inserted into the crust comes out clean, about 28 minutes. Serve warm. Enjoy!
  • FREEZER DIRECTIONS: The peach filling can be prepared and frozen in advance. I have frozen it for up to a year without any problems. Combine the peach filling ingredients in a large ziploc bag, press the air out and freeze flat. When you are ready to bake the cobbler, thaw in the refrigerator and then pour into the baking dish and proceed with the recipe.

Grilled Queso Panela With Shrimp and Roasted Tomatillo and Poblano Salsa

I received Tomatillo y Poblano salsa from the Bernard family and needless to say that the entire jar is GONE! It goes well with so many things… the flavor is full and the heat is medium, just right. When I was thinking “outside the jar”, I wanted to make something unique with a flavor profile that reminded me of summer. Shrimp and queso panela were the perfect combo for this simple dish with an impressive presentation. You can make this for a night at home to share, accompanied with fresh warm corn tortillas, or for company to really WOW your crowd. Alternatively, this can be made using homemade tomatillo salsa, however, Bernard’s salsa is absolutely deliciously and I highly recommend checking out their website!

Ingredients (for 2 servings)

  • 3 tablespoons finely chopped fresh cilantro
  • 12 ounces queso panela, cut into 1/2-inch slices
  • 6-8 extra large brown gulf shrimp
  • 1 tbsp olive oil
  • 4-6 tablespoons Tomatillo y Poblano Salsa
  • Corn tortillas, for serving

Instructions

  • Light one bbq pit full of charcoal. When all charcoal is lit and covered with gray ash, pour out and spread the coals evenly over entire surface of coal grate. Set cooking grate in place, cover grill and allow to preheat for 5 minutes.  Clean and oil the grilling grate. Grill cheese slices until browned on both sides, 1-2 minutes per side. Remove from grill. *alternatively can be grilled on a well oiled cast iron grill.
  • Toss shrimp in 1 tbsp salsa and 1 tbsp olive oil. In sauté pan, or on your bbq pit, cook shrimp until pink on both sides. Remove from heat and set aside.
  • Spread a layer of salsa on the bottom of a shallow dish or plate. Nestle cheese in salsa. Add the cooked shrimp on top of cheese. Spoon salsa and cilantro on top and serve immediately with warm tortillas.

Blackberry Mojito

Mojito’s are one of the most refreshing drinks, perfect for a hot day outdoors near the bbq pit. I wanted to make a twist on the classic, involving some type of berry. As I reflected on the flavors of a classic mojito, I thought blackberries would pair well with mint and would yield a sweet flavor without having to add simple syrup. I’m a huge fan of cocktails that use fruit for sweetness, without having to add sugar. Clean, simple and fresh ingredients, and delicious! Cheers!

Ingredients (2 servings)

  • 4 ounces white rum
  • 4 ounces club soda
  • 1 ounce lime juice, or 3 lime wedges
  • 6–7 mint leaves
  • 6-8  blackberries
  • 3/4 ounce simple syrup or 1 tablespoon of sugar *optional
  • cup of ice

Instructions

  • In a cocktail shaker, muddle mint leaves, blackberries until pulverized. *add sugar or simple syrup if you are adding it. Add rum and ice and shake for 10 seconds.
  • Pour contents into a glass (no straining) and top with two ounces of club soda. Stir and garnish with mint leaves and blackberry.
  • For different variations, substitute blackberries for raspberries, strawberries, mangos, blueberries, you name it!

Blackened Catfish

One of my favorite weeknight dinners is blackened catfish and pairing it with roasted broccoli or brussel sprouts. I love the flavor of the spicy cayenne, smoky paprika, herbal basil, thyme, and oregano, with savory onion and garlic, all seared to a buttery perfection with light flaky fish. It’s so satisfying and fulfilling, and it’s healthy! I wanted to make my own blackened seasoning instead of using store-bought, and after making this, I will never buy store bought again! It has the perfect ratio of seasonings and spice and just the right amount of salt. This batch recipe yields leftovers, so you can save in a jar for the next time you make it!

I also enjoy learning about the history of certain cuisines and recipes. This one without a doubt has strong cajun/creole roots, a perfect reflection of Louisiana culture! I loved reading about Chef Paul Prudhomme, the original inventor of “blackened” fish. Read more here!

Homemade Blackened Seasoning

  • 2 tablespoon smoked paprika (or use regular paprika)
  • 1 tablespoon cayenne powder (use more for a spicier blend)
  • 1 tablespoon onion powder
  • 1 teaspoon garlic powder
  • 1 teaspoon ground black pepper
  • 1 teaspoon sea salt
  • ½ teaspoon dried basil
  • ½ teaspoon dried oregano
  • ½ teaspoon dried thyme
  • Mix all of the ingredients together in a large mixing bowl until they are well combined. Store the seasoning blend in an airtight container. 

Ingredients for Blackened Catfish

  • 2 large catfish fillets
  • 2-3 tbsp homemade blackened seasoning
  • 4 tbsp salted butter
  • 2-4 lemon wedges

Instructions

  • Heat a large cast iron skillet (recommended) or heavy aluminum skillet over high heat for 10 minutes.
  • Coat both sides of fish with spice mixture, using about 1.1.5 tbsp spice mixture for each fillet.
  • Melt butter in skillet, then place the 2 fillets in the hot skillet.
  • Cook until the spices are burned onto the fillets and the catfish is opaque and flaky inside, about 3 minutes per side. 
  • Serve with lemon wedges!

Hot Spinach Dip

This is the biggest crowd pleaser of them all! I made for a party and everyone raved about how delicious it was…if only they knew how easy it was to make! The original recipe has artichoke in it as well, which is optional. I chose to make it without and really enjoyed the consistency. This is definitely my go-to recipe for a hot dip you can enjoy with or without company. Accompanied with a glass of cold white wine, this is the perfect appetizer!

Ingredients

  • 1 bag (9 oz.) baby spinach leaves or 1 box (10 oz.) frozen chopped spinach, cooked, cooled and squeezed dry
  • 1 package (8 oz.) cream cheese, softened
  • 3/4 cup real Mayonnaise
  • 1 1/2 cups shredded Mozzarella cheese
  • 1/4 cup grated Parmesan cheese
  • 1 package Knorr Vegetable recipe mix
  • 1 can (14 oz.) artichoke hearts, drained and chopped *Optional
  • 2 cloves garlic, finely chopped

Instructions

  • Preheat oven to 350°.
  • Combine all ingredients except 1/2 cup mozzarella and 1/4 cup parmesan. Spoon into a 2-quart casserole, then top with remaining cheese.
  • Bake for 35 minutes or until dip is hot.
  • Serve with crostini, soft French or Italian bread, or crackers.

Mango Pineapple Habanero Mahi Mahi

I had the ultimate pleasure of enjoying this seafood delight with Bernard’s Gourmet Mango Pineapple y Habanero roasted salsa! I connected with the Bernard’s on Instagram, and they were so kind to mail me two of their most popular award-winning salsas. They are a family-owned company out of McKinney, Texas, and are now sold in H-E-B! I absolutely love Texas-made products and supporting Texas businesses and families. After receiving my package, I couldn’t wait to try them so I could conjure up some creative recipes. The Mango Pineapple y Habanero roasted salsa is to DIE for. It is packed with flavor, a little heat, and tastes clean and fresh. That is what I love most about their brand, it is truly a clean label, no added sugar and all natural; it is almost like a neighbor handed me a homemade jar of salsa they made that afternoon. I am so happy I connected with this family, because I will continue to buy their products and try the variety of delicious salsas! When I tasted this, I immediately thought it would pair perfectly with seafood. Let me say, the sweet flavor profile of Mahi Mahi, with the sweet spiciness of the salsa and pico, took you to a different place for just a moment, as if I were dining at a beachside cafe enjoying fresh gulf-caught fish. Definitely recommend their salsas, I will add links to their website below. Happy Cinco De Mayo!

History of Cinco De Mayo

Cinco de Mayo, or the fifth of May, is a holiday that celebrates the date of the Mexican army’s May 5, 1862 victory over France at the Battle of Puebla during the Franco-Mexican War. The day, which falls on Tuesday, May 5 in 2020, is also known as Battle of Puebla Day. While it is a relatively minor holiday in Mexico, in the United States, Cinco de Mayo has evolved into a commemoration of Mexican culture and heritage, particularly in areas with large Mexican-American populations. Keep reading on History website!

Ingredients

For the Mango Pico De Gallo

  • 1/2 red bell pepper, seeded and chopped
  • 1/2  jalapeño, seeded and cored
  • 1 mango, peeled and diced
  • 1/4 medium red onion, chopped
  • 1/4 cup roughly chopped cilantro
  • 3 tbsp fresh squeezed lime juice
  • 1/2 teaspoon kosher salt

Instructions

  • First, in a shallow container, place both mahi mahi fillets with the 1/4 cup Mango Pineapple Habanero salsa to marinade for 1 hour in the refrigerator.
  • Begin preparing the mango pico de Gallo.
  • Cut the red pepper in half, core and remove stem and seeds. With a knife, remove the white interior membranes, then finely dice the pepper. Place in a large bowl. Repeat with the jalapeño.
  • Peel the mango, then slice fruit from the pit. Finely dice the fruit and add to the bowl. Finely dice the onion and add to the bowl with the cilantro, lime juice, and salt.
  • With a large spoon gently toss the ingredients together, being careful not to bruise the fruit. Taste, and adjust seasoning if necessary with more salt or lime juice. Place in refrigerator covered to keep cool.
  • Heat the olive oil in a large skillet over medium heat. Season the fish with salt, to taste. Cook the fish for 3 minutes, then turn and cook until just opaque, about 3 to 4 minutes more. 
  • Remove fillets from heat onto plate. Top with approximately 1 tbsp of Bernard’s salsa per fillet, and then the mango pico de gallo.
  • Serve immediately! Enjoy with Calabaza Squash Sauté

Calabaza Squash Sauté

I love making this as a side to accompany almost any Mexican style dish. It is healthy, simple, and full of flavor. I have adapted this recipe over the years, sometimes adding in a jalapeño for a little spice. The cumin, cilantro, oregano, and garlic all blend together with the fresh tomato juices, red onion sweetness, and fresh squash. If I pick this type of squash up at my local grocery produce department, H-E-B, it is labeled as “Calabaza” squash. This type of squash is used in latin cuisine and is often called “calabacitas”, with added corn and even pork or chicken as a main dish. If you google “Calabaza squash” you will not get this, rather a large gourd-looking type. After further research I discovered the true name of the type of squash coined “calabaza squash” here in South Texas, is actually named ‘Cuarzo’ Squash. It looks very similar to zucchini and tastes almost identical, however Cuarzo has small light colored spots on its outer skin. Zucchini can be substituted for this recipe.

Cuarzo Squash, or ‘Calabaza’ Squash

Ingredients (for 4 servings)

  • 3 large calabaza or zucchini, quartered
  • 1 medium ripe roma tomato, diced
  • 1 half medium red onion, chopped
  • 1-2 cloves garlic, minced
  • 1 tbsp cilantro, fresh (minced) or dried
  • 1 tsp cumin
  • 1 tsp oregano
  • 1 tsp kosher salt
  • 1 tsp olive oil for pan

Instructions

  • Cut ends off the squash, begin slicing into rounds. Once rounds of squash have been cut, cut them into quarters.
  • Dice the Roma tomato, chop the red onion half, mince the cloves of garlic, and mince the cilantro.
  • Heat a sauté pan over medium heat with olive oil.
  • Add your chopped produce into the pan.
  • Season with cumin, oregano, and salt.
  • Stir ingredients while heating, then cover with lid.
  • Intermittently stir ingredients and cover with lid after.
  • Allow to cook for about 15 minutes until veg appears tender.

Pepino Lime Michelada

Michelada, or Mexican red beer, is a classic spicy and refreshing drink and goes perfectly on a hot day. I was reading that the Michelada was first created in Mexico during the Mexican Revolution of 1910. As legend has it, the infamous military leader El General, Don Augusto Michel, would lead his battle hardened soldiers to his favorite cantina in San Luis Potosi to enjoy Mexican beer with lime and added hot sauce for character. If you are a Bloody Mary fan and have never had a Michelada, 10/10 recommend giving this tasty beverage a try!

Ingredients

  • 1 tbsp Chile lime seasoning (I used Twang-a-Rita Sunrise Spice)
  • 2/3 cup tomato juice or Clamato juice
  • 1/4 cup lime juice (about juice of 3 medium limes)
  • 4 drops worcestershire sauce
  • 4 drops soy sauce
  • 6 drops hot sauce ( I used Valentina)
  • Bottle of Mexican lager beer
  • Half a cucumber, peeled and diced
  • 2 lime wedges for garnish

Instructions

  • Peel half a cucumber and then dice roughly.
  • Add chile lime seasoning to a shallow plate.
  • Moisten the rim of a beer glass or mason jar with a lime wedge (or for a spicer version, use hot sauce like I did) and then dip them into the chile lime seasoning to coat the rim.
  • Fill both glasses with ice. Divide the Clamato and lime juice evenly into each glass.
  • Add 2 drops of worcestershire, soy and hot sauce into each glass as well.
  • Top each glass with the Mexican beer, stir, then top with diced cucumber and lime wedges and enjoy immediately!

Mesquite Smoked Ribs

Its BBQ and smoking season in Texas, we gather around the pit for the best tasting grilled and smoked meats and veggies all year ’round. We Texans are very competitive when it comes to our barbecue… homemade dry rubs, sauces, different cuts of meat, and technique, vary from each pit master. There is nothing better than pulling off that hot and smoky rack of ribs and cutting each rib, watching the delicious juices run onto the cutting board and your hair smelling like mesquite smoke. Logan made these with a unique dry rub he concocted himself. Now if you do not have a smoker and would prefer to make these in the oven, you can do so but part of the flavor comes from the smokiness (can use liquid smoke if you desire). I will put instructions for both below. We did not add BBQ sauce, however that would be a nice addition. Happy Spring!

Pork Rib Types

  • St. Louis Style Ribs (this is what we used)
  • Baby Back Ribs
  • Spareribs
  • Country Style ribs

How to prep your ribs:

  • Position the ribs meat-side down. Insert a paring knife under the membrane that covers the back of the rack. Loosen the membrane with the knife. Grab the membrane with your fingers and peel off completely.

Ingredients for Dry Rub

  • 1 tbsp kosher salt
  • 1 tbsp chili powder
  • 1 tbsp paprika
  • 1 tsp garlic powder
  • 1 tsp onion powder
  • 1 tsp dried oregano
  • 1 tsp black pepper
  • 1 tsp cayenne pepper (can add more if you want extra spice)

Ingredients for wet basting

  • 2 tbsp lemon juice
  • 2 tbsp Worcestershire sauce
  • 2 tsp apple cider vinegar

Instructions for Preparation

  • For the dry rub, mix all ingredients together in a small bowl.
  • Lay ribs on a large cookie sheet or a roasting pan, baste with brush both sides of the rack of ribs (this recipe was for 2 racks).
  • Rub all over both sides of the ribs with the dry rub.

How to Smoke Ribs (4.5-5 hours)

  • Soak medium to large size mesquite (or wood of choice) wood chips in water 1 hour, then prepare your grill for smoking filling the smoker box with one-quarter each of the wood chips. Start the charcoal in the smoker box until charcoal appears grey/white indicating a healthy heat.
  • Once the grill reaches 250 degrees F, lightly brush the grates with vegetable oil and place the ribs on the cooler side of the grill, meat-side up. Close the grill and let smoke 1 hour.
  • Replenish the smoker box with another one-quarter each of the wood chips. Close the grill and let smoke 1 more hour. At this point, baste ribs again with a bit of apple cider vinegar/water mixture (can use a spray bottle if you choose). Repeat this process every hour until the ribs are dark brown and tender and the meat starts to shrink away from the bones, about 2-3 more hours. Remove the ribs from the grill and let rest 5-10 minutes before slicing.

How to Cook Ribs in Oven (3.5-4 hours)

  • Preheat oven to 225 degrees F.
  • Place ribs, meat side down, in baking dishes.
  • Cover the baking dishes with aluminum foil and place in the oven.
  • After cooking for 3.5-4 hours, drain off the drippings. Flip the ribs over using two spatulas (and an extra set of hands if you have them) so the meat side is up. Be careful, as they may be so tender they fall apart.
  • If serving with BBQ Sauce, put a layer of BBQ sauce on the ribs and return to the oven uncovered for an additional 20-30 minutes.
  • Let Rest 5-10 minutes before slicing.

Slow Cooker Carnitas

Ok seriously, this was one of the best Mexican style recipes I have EVER made. My boyfriend and I were in awe and couldn’t believe how flavorful and delicious this turned out! We said, “who needs Mexican restaurants when you have your own kitchen!” We continually ate the leftovers for days… and the juices marinated further, creating a better tasting dish by the day. I cannot emphasize how good this recipe is, how easy it is, and how impressed your guests will be if you decide to host a Mexican Fiesta!

Ingredients

  • 1 (4-5 pound) lean boneless pork roast, excess fat trimmed, cut into 3-inch chunks
  • 1 cup beer (or chicken stock) * I used 1 bottle of Dos XX
  • 1 medium yellow onion, diced
  • 4 cloves garlic, peeled and minced
  • 1 chipotle in adobo sauce, minced) *use canned
  • 2 teaspoons ground cumin
  • 1 teaspoon black pepper
  • 1 teaspoon chili powder
  • 2 teaspoons sea salt * or to taste

Instructions

  • Add all ingredients to a large slow cooker and give the mixture a stir to combine. Cook on low for 6-8 hours or on high for 4-5 hours until the pork is completely tender and shreds easily with a fork. * I cooked 8 hours on low.
  • Serve immediately in tacos, burritos, salads, or whatever sounds good to you!  This pork can also be refrigerated in a sealed container for up to 3 days, or frozen in a sealed container for up to 3 months.